Pyrography: Decorative Art
by Kathleen Menéndez
Pyrography is an art form
often combined with others
as well as worked on many other surfaces
in addition to wood.
In Latin America, however, pyrography was developed
as a stand-alone decorative art form
that draws inspiration from many traditional decorative arts
The Emphasis is on Versatility
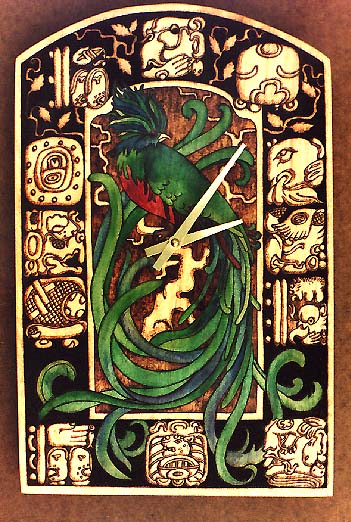 |
Quetzal Bird Clock Pyrograph by Kathleen Menéndez Design and Photograph by Sharon Garvey Inspired by Mayan stellae, Mayan glyphs (in the place of the clock's numbers) and the beautiful quetzal, exotic inhabitant of the Petén jungle and the Guatemalan national symbol of freedom |
"Pirograbado" they called it, when I went to visit a recently opened academy of art in Guatemala City back in 1975. I was looking at a little armoire, maybe 16 inches high. It looked like ivory inlaid in a dark wood and reminded me of decorative art objects I had seen in other parts of the world.
That visit had started as only a social call, at the invitation of a good friend, Lourdes De la Riva, who wanted to make me feel welcome in Guatemala and to show me her academy, the business venture that she and her sister Carmela Flores had started. This armoire she was showing me was woodburning as I had never known it could be—and my imagination took flight. I signed up for classes on the spot. It was two years later before I had attended classes in all of the courses they had on that subject. By then I knew I wanted to take those marvelous techniques back to the United States. Pyrography is the translation in English of pirograbado, and it is known by a similar name in many languages. (Back then, though, I'd never heard that archaic word. It was years later when that term came back into popular usage in the United States.)
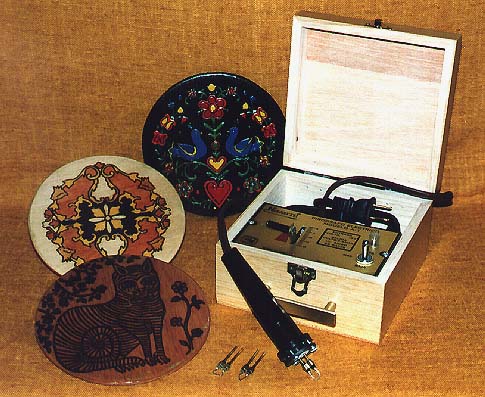
The Navarro Pyrocarver
shown with samplers
pyrocarved by Kathleen Menéndez
Photograph by Sharon Garvey
History of the Pyrographic Tool
Over fifty years ago, a Mexican named Pascual Navarro saw a simple electrical pyrography tool in France and returned to Mexico to set about manufacturing an improved, temperature-controlled version of that tool for use in Mexico and eventually for export to other countries in Latin America and the United States, as well. It is the same tool (with further improvements) that was being used in Guatemala when I learned pyrography in the 70's, and a modified version of it that is in use there still as the required equipment for the course work.
Back in the late 70's, I soon realized as I started my plans for showing the pyrographic techniques in the States that I would have to take the Navarro Pyrocarver with me, too, because, at that time, I found nothing available in the States but toy woodburning sets and a rudimentary tool that made use of a lightbulb for temperature control.
History of the Pyrographic Techniques
It was about 35 years ago when Pascual's son Enrique Navarro collaborated with a Mrs. Jarano to develop the pyrographic techniques that were to become so popular and so recognized in Mexico—a country rich in art and architecture, folklore, dance, and song—that they have been incorporated in the curriculum of many decorative art and other schools there, and, as we have seen, even in other countries. The techniques I learned at that Guatemalan academy of art were brought there by the two sisters who are naturalized Guatemalans, originally from Mexico.
Mexico and the rest of Latin America have a population mix that parallels that of the United States and Canada, but with different proportions (from the States and from each other). In Mexico and Guatemala, for example, the indigenous population is still very much a pervasive presence, while the European population still regards Europe as a cultural role model. Despite this, a new native population with a curious mix of both and a sprinkling of later immigrant populations has created a strong national tradition and culture, blended yet distinct from its original elements.
The pyrographic techniques developed in Mexico reflect a great admiration for, and interest in, the rich European heritage of decorative arts, fine woodworking, and furniture design, and, by association, the Asian influence from which those were inspired in great part so many centuries ago.
- The courses started with one I call Pyrotextures, which is the basic beginner technique where the student learns to use the tool to make lines, do shading, and use texture to make full use of the tool with its basic three points. The textures can be in the background (as I will mention later) or the foreground (see the textured pattern that makes up the design of the cat sampler, adapted from a centuries old Russian woodblock, shown in the picture with the Navarro Pyrocarver), or combined with other techniques as we will see later. Often the students at this level work in designs typically associated with pyrography. The Pyrotextures technique is very beautiful unto itself. Many pyrographers use burning alone in some or all of their work.
- The second technique teaches traditional designs and uses line and color (stain, not paint) for a look of wood inlay and adds shading to that for a marquetry look. The design dictates the procedure needed: Geometric patterns do not require shading; organic patterns do. (A traditional Italian wood inlay design—with no shading—is on the middle sampler in the picture of the Navarro Pyrocarver.)
- The third technique has more steps and employs traditional designs, line, stain, paint, finish, and pen work for a look of ivory or bone inlay.
- The fourth technique recreates the look of a ceramic tile inlaid in wood.
At the same time, these techniques, of which I have mentioned only the first ones, in their beauty and flexibility lend themselves to interpretations of enormous variety.
Once you've worked in some of the techniques, you will come to realize that the combinations can be rearranged to suit just about anything, and that realization comes in very handy by the time you "learn" your way to the technique I call "Folkloric," which ultimately might call for almost anything. The examples in this article are a reflection of just that and illustrate two very important points I have discussed here:
- The techniques can be combined and adapted as needed.
- The techniques can interpret any type of look the pyrographer wishes. Although they were primarily designed to interpret European decorative arts, they have been used, as seen in the pyrographs shown here, to interpret designs from many parts of the world.
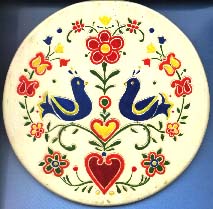
The class for Folkloric in Spanish is named "Oleos, Tintas, y Vinílicas," which literally means "Oils, Stains, and Acrylics." I renamed it "Folkloric" for different reasons, but the original name does emphasize one important aspect—the use of different kinds of color and color combinations. The class focused on some well-known traditional decorative folk art like Scandinavian rosemahling designs and combined those with pyrography.
Color was applied in different combinations. (It is important to make the distinction between stains and paints: Stains are transparent and allow both the burned line and the wood grain to show through the color; paints are opaque and cover both the pyrocarved line and the wood grain.) I later did samplers to illustrate this technique:
I took a simple Pennsylvania Dutch symmetrical pattern of mirror-image birds and flowers and repeated the identical burned outline on each of three identical round wood plaques.
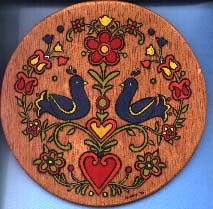 |
On the first plaque, I painted the birds and flowers in rich oil paints, left the background wood natural, and then finished the plaque with a clear matte lacquer. |
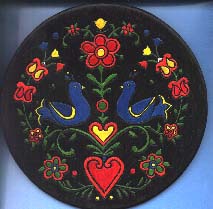 |
On the second plaque, I stained the plaque with a dark green stain, sealed the plaque, then painted the birds and flowers in bright acrylics, and finished the plaque with a clear lacquer (See also picture of Navarro Pyrocarver with sampler plaques above, sampler in back). |
 |
On the third, I painted the whole plaque with an acrylic white paint, next painted the birds and flowers in bright acrylics, then finished with a high gloss lacquer (if you have been observing these changes, you have noticed that this last has covered up the woodburned outline altogether—only the texture is left, and the woodburned "line or groove" separating the design elements now appears white rather than dark. |
This explanation provides a good summary of the course parameters for the Folkloric technique.
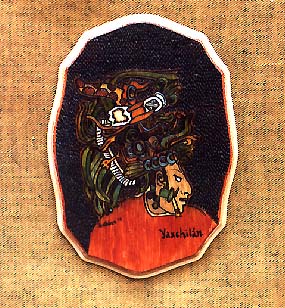
Mayan Noble
Pyrograph by Kathleen Menéndez
Inspired by an ancient Mayan image
Photograph by Sharon Garvey
Both The Quetzal Clock and the Mayan Noble pyrographs require using the basic shading point for curved lines to burn the outline in wood—with a very precise, controlled line—at a moderate temperature. The line does not need to be too deeply burned in the wood. With the basic dotter point, a pyrotexture background in an overall pattern of irregular dots was done on both pieces—behind the glyphs on the clock's outer edge and behind the figure of the Mayan noble. In addition, in the first pyrograph, behind the bird there is a heavily shaded background done with the basic shading point—the same one used for doing the curved lines. Shading was also done on the glyphs to make them appear three-dimensional; the effect is further enhanced against the textured background. The tree where the quetzal is perched is also shaded to provide dimension. In both pyrographs, stained color was added with either watercolors or India inks. The color on the originals of both pieces, especially the colors on the quetzal bird and the quetzal feathers on the Mayan's headdress, are very intense and luminous in quality.
Woods of Preference
As among most pyrographers, the general preference for these techniques is for woods that are very white, with little grain. This is so particularly when using techniques that require very perfect line work (easier on wood with little grain) and very transparent colors (colors will appear truer on whiter woods). Since many pyrographers may not make their own unfinished wood pieces, they may not be able to choose their wood of preference, and may be confronted with a less than desirable wood to decorate. In some cases, pyrographers might be working on an old, possibly antique piece of furniture that has been stripped of previous finishes. Very hard woods present a challenge, but working with a hotter point, a steady, firm (but definitely not heavy) hand, and a good measure of patience can overcome that obstacle. Sometimes it is advisable to let the wood dictate the technique to be employed, since some techniques lend themselves to more adaptability, particularly those that use a painted background that could cover flaws in a defective piece and even make something strikingly handsome out of a piece that might otherwise have been discarded.
 |
Monogrammed Box Pyrography by Kathleen M. Garvey Menéndez Inspired by a blackwork embroidery motif Photograph by Sharon Garvey |
Working on a Project
The pyrocarved monogrammed box shown here is a good example of working to find the right design for the style of the piece, appropriate techniques for the type or condition of the wood, and something pleasing for the client or recipient of the gift. It is also a good example of how to adapt designs from other sources. Following is how it came about:
I found an old English Leather wood box in the attic and peeled off the old label. The square box had darkened somewhat, but under the label the wood was much lighter. I always make the pattern to exactly fit the piece first, so I made my pattern of the top and another for one side. After folding the tracing paper first one way then the other to find the center and make equal parts, and placing it back onto the box, I discovered that the label (and now the light area) had actually been a bit crooked, so I realized that I would have to accommodate that problem, too.
In planning my composition, I decided to take advantage of the two wood colors, that, without staining, had been created naturally by the label. Since this box was already destined for a particular person, who had rather nice initials, I decided to use the lighter center to do a monogram. I went to a calligraphy book (pattern source no. 1) and found a letter type in a very nice size and picked out the three letters I needed. That was easy. Then I did a little straight border with a pattern from I'm-not-sure-where (pattern source no. 2) going around the light patch. By making it just thick enough, it covered the slightly crooked line and straightened out my center light patch. After that I wanted just one pattern to go over the entire box, since it was small and I wanted to keep the look simple. In a book I had picked up on Elizabethan blackwork embroidery (yes, EMBROIDERY—who would have thought?) I found a handsome geometric pattern (pattern source no. 3) of straight lines, happily in a size appropriate to the proportion of the box.
The pattern source was just a little section with the motif repeated maybe a few times, but by using my folded tracing paper, I could center it perfectly, trace a quarter of my pattern from the book, moving it over the original to connect to where I had left off and adding piece by piece until I had finished a quarter. Then I proceeded to trace the other three quarters from the first one now completed on my tracing paper pattern by simply folding back to back. (This explanation is more apparent if you have the piece of paper in front of you.)
With my pattern completed, I simply taped the tracing paper perfectly in place on my piece, slid a piece of single-use carbon paper underneath, and took my Pyrocarver dotter point, turned the heat on minimum temperature, and went over my tracing. With the design now copied onto my box, I removed both the tracing and carbon papers, and burned in the pattern all over the top, using the bar point for the straight lines. (I did the same for the sides.)
Next came the color decision. I knew I wanted to keep it simple. I already had two wood colors and decided to use woodburned shading in alternate sections of the pattern to give a third wood color and add dimension to the geometry. Last, I decided to take advantage of a small diamond pattern in the center of the geometry to make it look as though I had inlaid turquoise stones and bone in the wood. Using white acrylic and a couple of different blues and turquoises, I made a mixture of colors and painted every other little diamond a nice, but different turquoise color. That is, I did not just mix one color, but varied the turquoise slightly, the way it would be if you had actual pieces of the stone to inlay—irregular in color from one to the next. I also outlined the initials in pyrography but filled them with the turquoise color variations, and did a little turquoise in the small border around the initials, too. In a similar manner, I alternated with bone color as seen in the picture.
 |
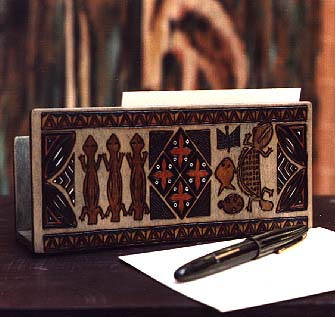 |
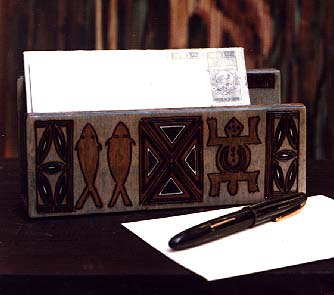
Letter Holder (Front and Back Views)
Pyrograph by Kathleen M. Garvey Menéndez
Inspired by traditional African motifs and symbols
Photograph by Sharon Garvey
Design Sources
Since these decorative art techniques draw from other decorative art forms such as wood inlay, marquetry, ivory inlay, ceramic, ethnic art, etc., they are naturally suited to many of the classical decorative arts designs, and from there, the sky's the limit. Once you start working in these ways, you will realize that there are all sorts of designs all around you, and if you work out your designs on tracing paper, you can adapt them perfectly to your plaque, box, clock face, or furniture. I recently spoke to the Northern Virginia Carvers on this subject, and I brought with me a large variety of books (other than books on pyrography) to give them an idea of the scope of what I was talking about. Following is an example of a simple adaptation and my own interpretation:
I once was commissioned to do a design for a serving cart that was destined for a house of Spanish colonial style. For inspiration, I went to a book of antique Spanish furniture; however, the designs I borrowed from that source were mostly not from the furniture pieces illustrated, but rather from the hasp, lock, and key patterns drawn there. I combined a series of those hardware patterns into an unusual geometric pattern, stained them a verdigris color to suggest metal, and left the wood behind them light with no stain. It looked like a wrought iron filigree.

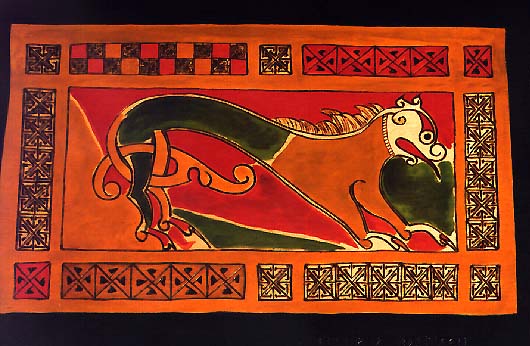
Lion (Symbol of St. Mark the Evangelist) on Tray and detail
Pyrograph by Kathleen Menéndez
After an original Celtic painting
Photograph by Sharon Garvey
The Celtic lion design in the pyrocarving above is an interesting variation in that the color is not always applied exactly within the pyrocarved outline. You can observe places on the lion where the color was applied (in keeping with the original Celtic painting) in uneven patches leaving a small margin of natural wood between the color and the woodburned outline or between one color and the next. This is not the usual case with pyrography where the woodburned line provides the border for the color.
Woodburning Patterns
The key is to cut a piece of tracing paper to exactly fit the surface you are planning to pyrocarve. Then go to any type of source that pleases you and start placing your tracing paper over it to see how it will fit or adapt. The tracing paper pattern should be folded very precisely into four sections, so that if you need a center point or want just a portion of a design you see, you can trace off just one quarter, and then trace the remaining three portions from the first. This last step is for designs that are symmetrical or geometric in type; obviously, if we are talking organic (animals, landscapes, or any pattern that is totally asymmetrical), the folding process will be useful for establishing your center point and the middle line, so that your composition won't be crooked or inadvertently thrown off balance.
Thanks to photocopy machines, you can even easily change the size of your original, which is a big help and saves a lot of time over older methods. Any patterns that have an outline are appropriate for woodburning an outline, too. If they look nice, but are too small to do in woodburning, simply enlarge your original and go from there. There are a lot of interesting coloring books with nice designs that you could use, either all (just as they appear) or in part (lift a particular pattern detail and go from there). Just go to sources with motifs that are appealing to you.
Finishing the Art Work
The woodburning part of a project is the first step and is always done on a sanded, clean surface. The finish is very important for most of these techniques. In fact, with some, it is essentially part of the technique. Since these decorative art techniques have various steps, often the wood sealer and lacquer are intermediate steps as well as a final finish after the completion of the project. The finish to be used for a given technique is described within the technique itself. The sealers and lacquers can vary and are dictated by the look defined in a particular technique as well as compatibility with the stains or paints used in that technique. Often the difference is simply that between matte and gloss finishes. In some cases, a yellowed look is desirable; in others, it might require crystal clear and high gloss. The finishes available today, which require fewer coats and are less problematic than the ones incorporated in the original techniques, can reduce the work and the time involved in most projects. Familiarity with new products can often provide new ideas to simplify a process.
The Road to Recognition
It is incredible that pyrography remains so obscure. There has, nevertheless, been a renewed interest of late in the English speaking countries of the world, as evidenced in the number of tools and books presently on the market. In Mexico, as well, a new wave of enthusiasts has emerged. It is our hope that the pyrography displayed in this e-museum will prove a beacon to other pyrographers and artists who would like to try their hand at this art form and a testimony to all of its merit.
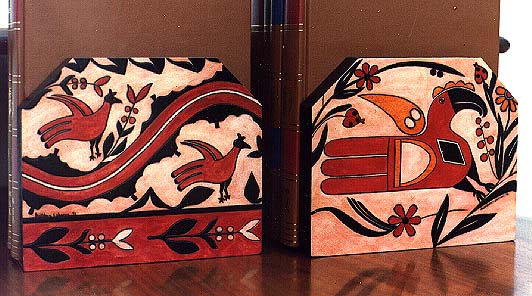 |
Bookends Pyrograph by Kathleen Menéndez, Design and Photograph by Sharon H. Garvey adapted from a pair of U.S. postage stamps depicting Pueblo Indian pottery from the southwestern United States |
 |
The Author/PyrographerKathleen M. Garvey Menéndez learned her pyrography techniques in Guatemala. Her sister, Artist Sharon H. Garvey later joined her there to collaborate on a pyrography project designed to promote this art form in the United States. Sharon designed and later photographed many of the pieces in their collection, and Kathleen executed most of them. They worked together planning each piece in the collection, usually three at different levels of difficulty, to exemplify each technique. Their goal was not to sell their art work, but to promote the art of pyrography in the United States, with the sample pieces, a didactic book, and the Navarro Pyrocarver. |
Artist
Sharon H. Garvey, like her sister, grew up in Falls Church, Virginia. She graduated with a BA in Fine Arts from Notre Dame and a Master's from St. John's College in Santa Fe, New Mexico. She seemed the perfect choice to be the one to illustrate the versatility of the pyrographic art form and the wide variety of decorative techniques for it, since she has distinguished herself in so many unusual art forms and media, such as exquisitely painted eggs, innovative cake sculpture, and the remarkable jack-o'-lanterns and art photographs for which she has become famous as the Pumpkin Lady of Harpers Ferry, where she resides with her husband, Tim Wisecarver. She recently did the pen&ink illustrations for a book, The New Appalachian Trail by their father, the renowned hiker and author Ed Garvey.
© 1997 Kathleen M. Garvey Menéndez
Last updated 01 January 2010.
This article was originally published in the Woodcarvers Online Magazine (March 1997 issue)
Back to E-Museum Entrance homepage